Hardware-Accelerated Video Transcoding
What exactly is Transcoding?
Transcoding is the technique of transforming one media encoding format into another.
This is typically done for compatibility purposes, such as when a media source provides a format that the intended target is not able to process; an in-between adaptation step is required:
- Decode media from its originally encoded state into raw, uncompressed information.
- Encode the raw data back, using a different codec that is supported by end user.
DeFFcode's FFdecoder API in conjunction with VidGear's WriteGear API is able to exploit almost any FFmpeg parameter for achieving anything imaginable with multimedia video data all while allowing us to process real-time video frames with immense flexibility. Both these APIs are capable of utilizing the potential of GPU backed fully-accelerated Hardware based video Decoding(FFdecoder API with hardware decoder) and Encoding (WriteGear API with hardware encoder), thus dramatically improving the transcoding performance. At same time, FFdecoder API Hardware-decoded frames are fully compatible with OpenCV's VideoWriter API for producing high-quality output video in real-time.
Limitation: Performance Bottleneck in Hardware-Accelerated Video Transcoding with Real-Time Frame Processing
When using FFmpeg with -hwaccel cuda -hwaccel_output_format cuda, decoded frames remain in GPU memory. This avoids costly memory transfers between system (CPU) memory and GPU memory, enabling near-optimal transcoding performance on supported hardware.
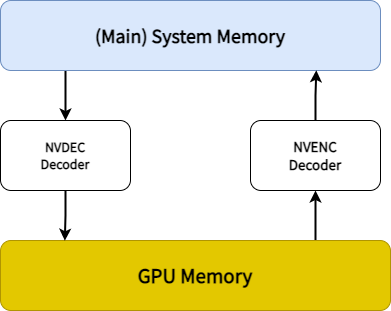
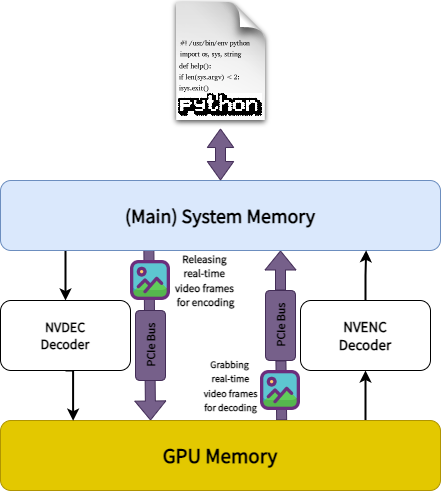
However, when integrating real-time frame processing in Python using FFdecoder and WriteGear APIs, this advantage is partially lost. To operate on individual frames within Python, decoded frames must be transferred from GPU memory back to system memory.
This introduces a critical bottleneck:
- Explicit GPU ↔ CPU memory transfers over the PCIe bus
- Increased latency due to data movement overhead
- Higher PCIe bandwidth utilization, especially with uncompressed frame data
- Potential bus saturation, limiting overall throughput
As a result, the pipeline incurs additional overhead that directly impacts real-time performance.
That said, hardware-accelerated encoding and decoding still provide significant advantages:
- Lower CPU utilization, as most processing remains on the GPU
- Faster execution compared to CPU-based (software) pipelines
- Efficient video operations, including scaling, deinterlacing, and filtering
- Better overall system resource distribution, freeing CPU for parallel workloads
In contrast, software-based transcoding is entirely CPU-bound and typically less efficient for high-throughput or real-time scenarios.
While GPU–CPU memory transfers introduce unavoidable overhead in real-time processing pipelines, hardware acceleration still delivers substantial performance and efficiency gains—making it the preferred approach for most modern video workflows.
We'll discuss its Hardware-Accelerated Video Transcoding capabilities using these APIs briefly in the following recipes:
DeFFcode APIs requires FFmpeg executable
DeFFcode APIs MUST requires valid FFmpeg executable for all of its core functionality, and any failure in detection will raise RuntimeError immediately. Follow dedicated FFmpeg Installation doc ➶ for its installation.
Additional Python Dependencies for following recipes
Following recipes requires additional python dependencies which can be installed easily as below:
-
OpenCV: OpenCV is required for previewing video frames. You can easily install it directly via
pip:OpenCV installation from source
You can also follow online tutorials for building & installing OpenCV on Windows, Linux, MacOS and Raspberry Pi machines manually from its source.
 Make sure not to install both pip and source version together. Otherwise installation will fail to work!
Other OpenCV binaries
OpenCV maintainers also provide additional binaries via pip that contains both main modules and contrib/extra modules
opencv-contrib-python, and for server (headless) environments likeopencv-python-headlessandopencv-contrib-python-headless. You can also install any one of them in similar manner. More information can be found here. -
VidGear: VidGear is required for lossless encoding of video frames into file/stream. You can easily install it directly via
pip:
Always use FFdecoder API's terminate() method at the end to avoid undesired behavior.
CUDA-accelerated Video Transcoding with OpenCV's VideoWriter API
Example Assumptions
Please note that following recipe explicitly assumes:
- You're running Linux operating system with a supported NVIDIA GPU.
-
You're using FFmpeg 4.4 or newer, configured with at least
--enable-nonfree --enable-cuda-nvcc --enable-libnpp --enable-cuvid --enable-nvencconfiguration flags during compilation. For compilation follow these instructions ➶Verifying NVDEC/CUDA support in FFmpeg
To use CUDA Video-decoder(
cuda), remember to check if your FFmpeg compiled with it by executing following commands in your terminal, and observing if output contains something similar as follows:$ ffmpeg -hide_banner -pix_fmts | grep cuda ..H.. cuda 0 0 0 $ ffmpeg -hide_banner -filters | egrep "cuda|npp" ... bilateral_cuda V->V GPU accelerated bilateral filter ... chromakey_cuda V->V GPU accelerated chromakey filter ... colorspace_cuda V->V CUDA accelerated video color converter ... hwupload_cuda V->V Upload a system memory frame to a CUDA device. ... overlay_cuda VV->V Overlay one video on top of another using CUDA ... scale_cuda V->V GPU accelerated video resizer ... scale_npp V->V NVIDIA Performance Primitives video scaling and format conversion ... scale2ref_npp VV->VV NVIDIA Performance Primitives video scaling and format conversion to the given reference. ... sharpen_npp V->V NVIDIA Performance Primitives video sharpening filter. ... thumbnail_cuda V->V Select the most representative frame in a given sequence of consecutive frames. ... transpose_npp V->V NVIDIA Performance Primitives video transpose T.. yadif_cuda V->V Deinterlace CUDA framesVerifying H.264 NVENC encoder support in FFmpeg
To use NVENC Video-encoder(
cuda), remember to check if your FFmpeg compiled with H.264 NVENC encoder support. You can easily do this by executing following one-liner command in your terminal, and observing if output contains something similar as follows:$ ffmpeg -hide_banner -encoders | grep nvenc V....D av1_nvenc NVIDIA NVENC av1 encoder (codec av1) V....D h264_nvenc NVIDIA NVENC H.264 encoder (codec h264) V....D hevc_nvenc NVIDIA NVENC hevc encoder (codec hevc)You can also use other NVENC encoder in the similar way, if supported.
-
You already have appropriate Nvidia video drivers and related softwares installed on your machine.
- If the stream is not decodable in hardware (for example, it is an unsupported codec or profile) then it will still be decoded in software automatically, but hardware filters won't be applicable.
These assumptions MAY/MAY NOT suit your current setup. Kindly use suitable parameters based your system platform and hardware settings only.
In this example, we will be:
- Using Nvidia's CUDA Internal hwaccel Video decoder(
cuda) in FFdecoder API to automatically detect best NV-accelerated video codec and keeping video frames in GPU memory (for applying hardware filters) for achieving GPU-accelerated decoding of a given video file (sayfoo.mp4). - Scaling and Cropping decoded frames in GPU memory.
- Downloading decoded frames into system memory as patched NV12 frames.
- Converting NV12 frames into BGR pixel-format using OpenCV's
cvtcolormethod. - Encoding BGR frames with OpenCV's VideoWriter API.
You can use FFdecoder's metadata property object that dumps source Video's metadata information (as JSON string) to retrieve source framerate.
With FFdecoder API, frames extracted with YUV pixel formats (yuv420p, yuv444p, nv12, nv21 etc.) are generally incompatible with OpenCV APIs such as imshow(). But you can make them easily compatible by using exclusive -enforce_cv_patch boolean attribute of its ffparam dictionary parameter.
More information on Nvidia's NVENC Encoder can be found here ➶
# import the necessary packages
from deffcode import FFdecoder
import json
import cv2

# define suitable FFmpeg parameter
ffparams = {
    "-vcodec": None,  # skip source decoder and let FFmpeg chose
    "-enforce_cv_patch": True # enable OpenCV patch for YUV(NV12) frames
    "-ffprefixes": [
        "-vsync",
        "0",  # prevent duplicate frames
        "-hwaccel",
        "cuda",  # accelerator
        "-hwaccel_output_format",
        "cuda",  # output accelerator
    ],
    "-custom_resolution": "null",  # discard source `-custom_resolution`
    "-framerate": "null",  # discard source `-framerate`
    "-vf": "scale_cuda=640:360," # scale to 640x360 in GPU memory
    + "crop=80:60:200:100," # crop a 80×60 section from position (200, 100) in GPU memory
    + "hwdownload,"  # download hardware frames to system memory
    + "format=nv12",  # convert downloaded frames to NV12 pixel format
}

# initialize and formulate the decoder with `foo.mp4` source
decoder = FFdecoder(
    "foo.mp4",
    frame_format="null",  # discard source frame pixel format
    verbose = False, # to avoid too much clutter
    **ffparams # apply various params and custom filters
).formulate()

# retrieve JSON Metadata and convert it to dict
metadata_dict = json.loads(decoder.metadata)

# prepare OpenCV parameters
FOURCC = cv2.VideoWriter_fourcc("M", "J", "P", "G")
FRAMERATE = metadata_dict["output_framerate"]
FRAMESIZE = tuple(metadata_dict["output_frames_resolution"])

# Define writer with parameters and suitable output filename for e.g. `output_foo_gray.avi`
writer = cv2.VideoWriter("output_foo.avi", FOURCC, FRAMERATE, FRAMESIZE)

# grab the NV12 frames from the decoder
for frame in decoder.generateFrame():

    # check if frame is None
    if frame is None:
        break

    # convert it to `BGR` pixel format,
    # since write() method only accepts `BGR` frames
    frame = cv2.cvtColor(frame, cv2.COLOR_YUV2BGR_NV12)

    # {do something with the BGR frame here}

    # writing BGR frame to writer
    writer.write(frame)

# close output window
cv2.destroyAllWindows()

# terminate the decoder
decoder.terminate()

# safely close writer
writer.close()
CUDA-NVENC-accelerated Video Transcoding with WriteGear API
WriteGear's Compression Mode support for FFdecoder API is currently in beta so you can expect much higher than usual CPU utilization!
Lossless transcoding with FFdecoder and WriteGear API
VidGear's WriteGear API implements a complete, flexible, and robust wrapper around FFmpeg in compression mode for encoding real-time video frames to a lossless compressed multimedia output file(s)/stream(s).
DeFFcode's FFdecoder API in conjunction with WriteGear API creates a high-level High-performance Lossless FFmpeg Transcoding (Decoding + Encoding) Pipeline  that is able to exploit almost any FFmpeg parameter for achieving anything imaginable with multimedia video data all while allow us to manipulate the real-time video frames with immense flexibility.
Example Assumptions
Please note that following recipe explicitly assumes:
- You're running Linux operating system with a supported NVIDIA GPU.
-
You're using FFmpeg 4.4 or newer, configured with at least
--enable-nonfree --enable-cuda-nvcc --enable-libnpp --enable-cuvid --enable-nvencconfiguration flags during compilation. For compilation follow these instructions ➶Verifying NVDEC/CUDA support in FFmpeg
To use CUDA Video-decoder(
cuda), remember to check if your FFmpeg compiled with it by executing following commands in your terminal, and observing if output contains something similar as follows:$ ffmpeg -hide_banner -pix_fmts | grep cuda ..H.. cuda 0 0 0 $ ffmpeg -hide_banner -filters | egrep "cuda|npp" ... bilateral_cuda V->V GPU accelerated bilateral filter ... chromakey_cuda V->V GPU accelerated chromakey filter ... colorspace_cuda V->V CUDA accelerated video color converter ... hwupload_cuda V->V Upload a system memory frame to a CUDA device. ... overlay_cuda VV->V Overlay one video on top of another using CUDA ... scale_cuda V->V GPU accelerated video resizer ... scale_npp V->V NVIDIA Performance Primitives video scaling and format conversion ... scale2ref_npp VV->VV NVIDIA Performance Primitives video scaling and format conversion to the given reference. ... sharpen_npp V->V NVIDIA Performance Primitives video sharpening filter. ... thumbnail_cuda V->V Select the most representative frame in a given sequence of consecutive frames. ... transpose_npp V->V NVIDIA Performance Primitives video transpose T.. yadif_cuda V->V Deinterlace CUDA framesVerifying H.264 NVENC encoder support in FFmpeg
To use NVENC Video-encoder(
cuda), remember to check if your FFmpeg compiled with H.264 NVENC encoder support. You can easily do this by executing following one-liner command in your terminal, and observing if output contains something similar as follows:$ ffmpeg -hide_banner -encoders | grep nvenc V....D av1_nvenc NVIDIA NVENC av1 encoder (codec av1) V....D h264_nvenc NVIDIA NVENC H.264 encoder (codec h264) V....D hevc_nvenc NVIDIA NVENC hevc encoder (codec hevc)You can also use other NVENC encoder in the similar way, if supported.
-
You already have appropriate Nvidia video drivers and related softwares installed on your machine.
- If the stream is not decodable in hardware (for example, it is an unsupported codec or profile) then it will still be decoded in software automatically, but hardware filters won't be applicable.
These assumptions MAY/MAY NOT suit your current setup. Kindly use suitable parameters based your system platform and hardware settings only.
Additional Parameters in WriteGear API
WriteGear API only requires a valid Output filename (e.g. output_foo.mp4) as input, but you can easily control any output specifications (such as bitrate, codec, framerate, resolution, subtitles, etc.) supported by FFmpeg (in use).
You can use FFdecoder's metadata property object that dumps source Video's metadata information (as JSON string) to retrieve source framerate.
In this example, we will be:
- Using Nvidia's CUDA Internal hwaccel Video decoder(
cuda) in FFdecoder API to automatically detect best NV-accelerated video codec and keeping video frames in GPU memory (for applying hardware filters) for achieving GPU-accelerated decoding of a given video file (sayfoo.mp4). - Scaling and Cropping decoded frames in GPU memory.
- Downloading decoded frames into system memory as patched NV12 frames.
- Converting patched NV12 frames into BGR pixel-format using OpenCV's
cvtcolormethod. - Encoding BGR frames with WriteGear API using Nvidia's Hardware accelerated H.264 NVENC Video-encoder(
h264_nvenc) into lossless video file in the GPU memory.
# import the necessary packages
from deffcode import FFdecoder
from vidgear.gears import WriteGear
import json
import cv2

# define suitable FFmpeg parameter
ffparams = {
    "-vcodec": None,  # skip source decoder and let FFmpeg chose
    "-enforce_cv_patch": True # enable OpenCV patch for YUV(NV12) frames
    "-ffprefixes": [
        "-vsync",
        "0",  # prevent duplicate frames
        "-hwaccel",
        "cuda",  # accelerator
        "-hwaccel_output_format",
        "cuda",  # output accelerator
    ],
    "-custom_resolution": "null",  # discard source `-custom_resolution`
    "-framerate": "null",  # discard source `-framerate`
    "-vf": "scale_cuda=640:360,"  # scale to 640x360 in GPU memory
    + "crop=80:60:200:100," # crop a 80×60 section from position (200, 100) in GPU memory
    + "hwdownload,"  # download hardware frames to system memory
    + "format=nv12",  # convert downloaded frames to NV12 pixel format
}

# initialize and formulate the decoder with `foo.mp4` source
decoder = FFdecoder(
    "foo.mp4",
    frame_format="null",  # discard source frame pixel format
    verbose = False, # to avoid too much clutter
    **ffparams # apply various params and custom filters
).formulate()

# retrieve framerate from JSON Metadata and pass it as
# `-input_framerate` parameter for controlled framerate
output_params = {
    "-input_framerate": json.loads(decoder.metadata)["output_framerate"],
    "-vcodec": "h264_nvenc", # H.264 NVENC Video-encoder

}

# Define writer with default parameters and suitable
# output filename for e.g. `output_foo.mp4`
writer = WriteGear(output="output_foo.mp4", logging=True, **output_params)

# grab the NV12 frames from the decoder
for frame in decoder.generateFrame():

    # check if frame is None
    if frame is None:
        break

    # convert it to `BGR` pixel format
    frame = cv2.cvtColor(frame, cv2.COLOR_YUV2BGR_NV12)

    # {do something with the BGR frame here}

    # writing BGR frame to writer
    writer.write(frame)

# close output window
cv2.destroyAllWindows()

# terminate the decoder
decoder.terminate()

# safely close writer
writer.close()
In this example, we will be:
- Using Nvidia's CUDA Internal hwaccel Video decoder(
cuda) in FFdecoder API to automatically detect best NV-accelerated video codec and keeping video frames in GPU memory (for applying hardware filters) for achieving GPU-accelerated decoding of a given video file (sayfoo.mp4). - Scaling and Cropping decoded frames in GPU memory.
- Downloading decoded frames into system memory as NV12 frames.
- Encoding NV12 frames directly with WriteGear API using Nvidia's Hardware accelerated H.264 NVENC Video-encoder(
h264_nvenc) into lossless video file in the GPU memory.
# import the necessary packages
from deffcode import FFdecoder
from vidgear.gears import WriteGear
import json
import cv2

# define suitable FFmpeg parameter
ffparams = {
    "-vcodec": None,  # skip source decoder and let FFmpeg chose
    "-ffprefixes": [
        "-vsync",
        "0",  # prevent duplicate frames
        "-hwaccel",
        "cuda",  # accelerator
        "-hwaccel_output_format",
        "cuda",  # output accelerator
    ],
    "-custom_resolution": "null",  # discard source `-custom_resolution`
    "-framerate": "null",  # discard source `-framerate`
    "-vf": "scale_cuda=640:360,"  # scale to 640x360 in GPU memory
    + "crop=80:60:200:100,"  # crop a 80×60 section from position (200, 100) in GPU memory
    + "hwdownload,"  # download hardware frames to system memory
    + "format=nv12",  # convert downloaded frames to NV12 pixel format
}

# initialize and formulate the decoder with `foo.mp4` source
decoder = FFdecoder(
    "foo.mp4",
    frame_format="null",  # discard source frame pixel format
    verbose = False, # to avoid too much clutter
    **ffparams # apply various params and custom filters
).formulate()

# retrieve framerate from JSON Metadata and pass it as
# `-input_framerate` parameter for controlled framerate
output_params = {
    "-input_framerate": json.loads(decoder.metadata)["output_framerate"],
    "-vcodec": "h264_nvenc", # H.264 NVENC Video-encoder
    "-input_pixfmt": "nv12", # input frames pixel format as `NV12`
}

# Define writer with default parameters and suitable
# output filename for e.g. `output_foo.mp4`
writer = WriteGear(output="output_foo.mp4", logging=True, **output_params)

# grab the NV12 frames from the decoder
for frame in decoder.generateFrame():

    # check if frame is None
    if frame is None:
        break

    # {do something with the NV12 frame here}

    # writing NV12 frame to writer
    writer.write(frame)

# close output window
cv2.destroyAllWindows()

# terminate the decoder
decoder.terminate()

# safely close writer
writer.close()
CUDA-NVENC-accelerated End-to-end Lossless Video Transcoding with WriteGear API
DeFFcode's FFdecoder API in conjunction with VidGear's WriteGear API creates a High-performance Lossless FFmpeg Transcoding Pipeline