Decoding Live Virtual Sources
Instead of using prerecorded video files as streams, DeFFcode's FFdecoder API with the help of powerful
lavfi(Libavfilter input virtual device) source that reads data from the open output pads of a libavfilter filtergraph, is also capable of creating virtual video frames out of thin air in real-time, which you might want to use as input for testing, compositing, and merging with other streams to obtain desired output on-the-fly.
We'll discuss the recipies for generating Live Fake Sources briefly below:
DeFFcode APIs requires FFmpeg executable
DeFFcode APIs MUST requires valid FFmpeg executable for all of its core functionality, and any failure in detection will raise RuntimeError immediately. Follow dedicated FFmpeg Installation doc ➶ for its installation.
Additional Python Dependencies for following recipes
Following recipes requires additional python dependencies which can be installed easily as below:
-
OpenCV: OpenCV is required for previewing video frames. You can easily install it directly via
pip:OpenCV installation from source
You can also follow online tutorials for building & installing OpenCV on Windows, Linux, MacOS and Raspberry Pi machines manually from its source.
 Make sure not to install both pip and source version together. Otherwise installation will fail to work!
Other OpenCV binaries
OpenCV maintainers also provide additional binaries via pip that contains both main modules and contrib/extra modules
opencv-contrib-python, and for server (headless) environments likeopencv-python-headlessandopencv-contrib-python-headless. You can also install any one of them in similar manner. More information can be found here.
Always use FFdecoder API's terminate() method at the end to avoid undesired behavior.
Never name your python script deffcode.py
When trying out these recipes, never name your python script deffcode.py otherwise it will result in ModuleNotFound error.
Generate and Decode frames from Sierpinski pattern
The
sierpinskigraph generates a Sierpinski carpet/triangle fractal, and randomly pan around by a single pixel each frame.

In this example we will generate and decode 8 seconds of a Sierpinski carpet fractal pattern of 1280x720 frame size and 30 framerate using sierpinski graph source with lavfi input virtual device in FFdecoder API, and preview decoded frames using OpenCV Library's cv2.imshow() method in real-time.
By default, OpenCV expects BGR format frames in its cv2.imshow() method.
# import the necessary packages
from deffcode import FFdecoder
import cv2

# playback time of 8 seconds
ffparams = {"-ffprefixes": ["-t", "8"]}

# initialize and formulate the decoder with "sierpinski" source of
# `1280x720` frame size and `30` framerate for BGR24 output
decoder = FFdecoder(
    "sierpinski=size=1280x720:rate=30",
    source_demuxer="lavfi",
    frame_format="bgr24",
    **ffparams
).formulate()

# grab the BGR24 frame from the decoder
for frame in decoder.generateFrame():

    # check if frame is None
    if frame is None:
        break

    # {do something with the frame here}

    # Show output window
    cv2.imshow("Output", frame)

    # check for 'q' key if pressed
    key = cv2.waitKey(1) & 0xFF
    if key == ord("q"):
        cv2.imwrite('foo_image.gif', frame)
        break

# close output window
cv2.destroyAllWindows()

# terminate the decoder
decoder.terminate()
Generate and Decode frames from Test Source pattern
The
testsrcgraph generates a test video pattern showing a color pattern, a scrolling gradient, and a timestamp. This is useful for testing purposes.

In this example we will generate and decode 10 seconds of a Test Source pattern (1280x720 frame size & 30 framerate) using testsrc graph source with lavfi input virtual device in FFdecoder API, all while previewing decoded frames using OpenCV Library's cv2.imshow() method in real-time.
By default, OpenCV expects BGR format frames in its cv2.imshow() method.
# import the necessary packages
from deffcode import FFdecoder
import cv2

# define parameters
ffparams = {
    "-ffprefixes": ["-t", "10"],  # playback time of 10 seconds
}

# initialize and formulate the decoder with "testsrc" source of
# `1280x720` frame size and `30` framerate for BGR24 output
decoder = FFdecoder(
    "testsrc=size=1280x720:rate=30",
    source_demuxer="lavfi",
    frame_format="bgr24",
    **ffparams
).formulate()

# grab the BGR24 frame from the decoder
for frame in decoder.generateFrame():

    # check if frame is None
    if frame is None:
        break

    # {do something with the frame here}

    # Show output window
    cv2.imshow("Output", frame)

    # check for 'q' key if pressed
    key = cv2.waitKey(1) & 0xFF
    if key == ord("q"):
        break

# close output window
cv2.destroyAllWindows()

# terminate the decoder
decoder.terminate()
Generate and Decode frames from Gradients with custom Text effect
The
gradientsgraph (as name suggests) generates several random gradients.

In this example we will generate and decode 15 seconds of Gradients using gradients graph source with lavfi input virtual device and also draw real-time text output (format HH::MM::SS) scrolling upward direction on it using drawtext filter in FFdecoder API, all while previewing decoded frames using OpenCV Library's cv2.imshow() method in real-time.
This example assumes you're running Windows machine. If not, then change fontfile parameter path in drawtext video filtergraph definition accordingly.
By default, OpenCV expects BGR format frames in its cv2.imshow() method.
# import the necessary packages
from deffcode import FFdecoder
import cv2

# define parameters
ffparams = {
    "-ffprefixes": ["-t", "15"],  # playback time of 15 seconds
    "-vf": "drawtext="  # draw text
    + "text='%{localtime\:%X}':"  # real time text (HH::MM::SS)
    + "fontfile='c\:\/windows\/fonts\/arial.ttf':"  # fontfile path (Only Windows)
    + "x=(w-text_w)/2:y=h-40*t:"  # scroll upward effect
    + "fontsize=50:"  # font size 50
    + "fontcolor=white",  # font color white
}


# initialize and formulate the decoder with
# "gradients" source for BGR24 output
decoder = FFdecoder(
    "gradients=n=3",
    source_demuxer="lavfi",
    frame_format="bgr24",
    **ffparams
).formulate()

# grab the BGR24 frame from the decoder
for frame in decoder.generateFrame():

    # check if frame is None
    if frame is None:
        break

    # {do something with the frame here}

    # Show output window
    cv2.imshow("Output", frame)

    # check for 'q' key if pressed
    key = cv2.waitKey(1) & 0xFF
    if key == ord("q"):
        break

# close output window
cv2.destroyAllWindows()

# terminate the decoder
decoder.terminate()
Generate and Decode frames from Mandelbrot test pattern with vectorscope & waveforms
The
mandelbrotgraph generate a Mandelbrot set fractal, that progressively zoom towards a specfic point.
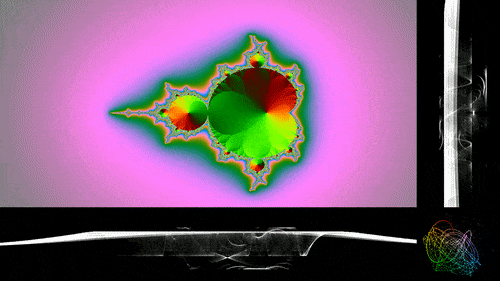
In this example we will generate and decode 20 seconds of a Mandelbrot test pattern (1280x720 frame size & 30 framerate) using mandelbrot graph source with lavfi input virtual device with a vectorscope (plots 2 color component values) & two waveforms (plots YUV color component intensity) stacked to it in FFdecoder API, all while previewing decoded frames using OpenCV Library's cv2.imshow() method in real-time.
By default, OpenCV expects BGR format frames in its cv2.imshow() method.
# import the necessary packages
from deffcode import FFdecoder
import cv2

# define parameters
ffparams = {
    "-ffprefixes": ["-t", "20"],  # playback time of 20 seconds
    "-vf": "format=yuv444p," # change input format to yuv444p
    + "split=4[a][b][c][d]," # split input into 4 identical outputs.
    + "[a]waveform[aa],"  # apply waveform on first output
    + "[b][aa]vstack[V],"  # vertical stack 2nd output with waveform [V]
    + "[c]waveform=m=0[cc],"  # apply waveform on 3rd output
    + "[d]vectorscope=color4[dd],"  # apply vectorscope on 4th output
    + "[cc][dd]vstack[V2],"  # vertical stack waveform and vectorscope [V2]
    + "[V][V2]hstack",  # horizontal stack [V] and [V2] vertical stacks
}

# initialize and formulate the decoder with "mandelbrot" source of
# `1280x720` frame size and `30` framerate for BGR24 output
decoder = FFdecoder(
    "mandelbrot=size=1280x720:rate=30",
    source_demuxer="lavfi",
    frame_format="bgr24",
    **ffparams
).formulate()

# grab the BGR24 frame from the decoder
for frame in decoder.generateFrame():

    # check if frame is None
    if frame is None:
        break

    # {do something with the frame here}

    # Show output window
    cv2.imshow("Output", frame)

    # check for 'q' key if pressed
    key = cv2.waitKey(1) & 0xFF
    if key == ord("q"):
        break

# close output window
cv2.destroyAllWindows()

# terminate the decoder
decoder.terminate()
Generate and Decode frames from Game of Life Visualization
The
lifegraph generates a life pattern based on a generalization of John Conway’s life game. The sourced input represents a life grid, each pixel represents a cell which can be in one of two possible states, alive or dead. Every cell interacts with its eight neighbours, which are the cells that are horizontally, vertically, or diagonally adjacent. At each interaction the grid evolves according to the adopted rule, which specifies the number of neighbor alive cells which will make a cell stay alive or born.
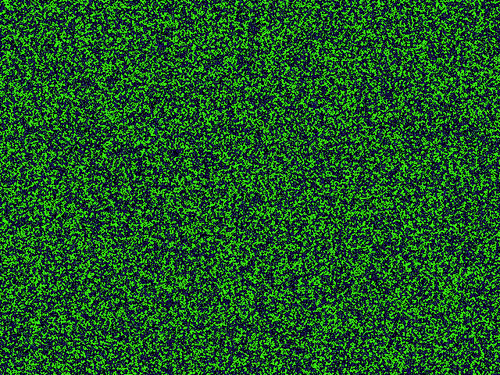
In this example we will generate and decode 25 seconds of Game of Life Visualization using life graph source with lavfi input virtual device in FFdecoder API, all while previewing decoded frames using OpenCV Library's cv2.imshow() method in real-time.
By default, OpenCV expects BGR format frames in its cv2.imshow() method.
# import the necessary packages
from deffcode import FFdecoder
import cv2

# define parameters
ffparams = {
    "-ffprefixes": ["-t", "25"],  # playback time of 25 seconds
}

# initialize and formulate the decoder with "life" source for BGR24 output
decoder = FFdecoder(
    "life="  # life graph
    + "s=640x480:"  # grid size (in pixels)
    + "mold=10:"  # cell mold speed
    + "r=36:"  # framerate
    + "ratio=0.5:"  # random fill ratio for the initial random grid
    + "death_color=#39FF14:"  # color of dead cells
    + "life_color=#1d1160" # color of living (or new born) cells
    + ",scale=640:480:" # frame size
    + "flags=16",
    source_demuxer="lavfi",
    frame_format="bgr24",
    **ffparams
).formulate()

# grab the BGR24 frame from the decoder
for frame in decoder.generateFrame():

    # check if frame is None
    if frame is None:
        break

    # {do something with the frame here}

    # Show output window
    cv2.imshow("Output", frame)

    # check for 'q' key if pressed
    key = cv2.waitKey(1) & 0xFF
    if key == ord("q"):
        break

# close output window
cv2.destroyAllWindows()

# terminate the decoder
decoder.terminate()