After going through ScreenGear Usage Examples, Checkout more of its advanced configurations here ➶
Recommended: Install DXcam library on Windows Machines
On Windows Machines, if installed, ScreenGear API uses dxcam backend machines for higher FPS performance. Thereby, it is highly recommended to install it via pip as follows:
# import required librariesfromvidgear.gearsimportScreenGearimportcv2# open video stream with default parametersstream=ScreenGear().start()# loop overwhileTrue:# read frames from streamframe=stream.read()# check for frame if NonetypeifframeisNone:break# {do something with the frame here}# Show output windowcv2.imshow("Output Frame",frame)# check for 'q' key if pressedkey=cv2.waitKey(1)&0xFFifkey==ord("q"):break# close output windowcv2.destroyAllWindows()# safely close video streamstream.stop()
ScreenGear API provides us the flexibility to directly set the dimensions of capturing-area of the screen. These dimensions can be easily applied to ScreenGear API through its options dictionary parameter by formatting them as its attributes.
Supported Dimensional Attributes
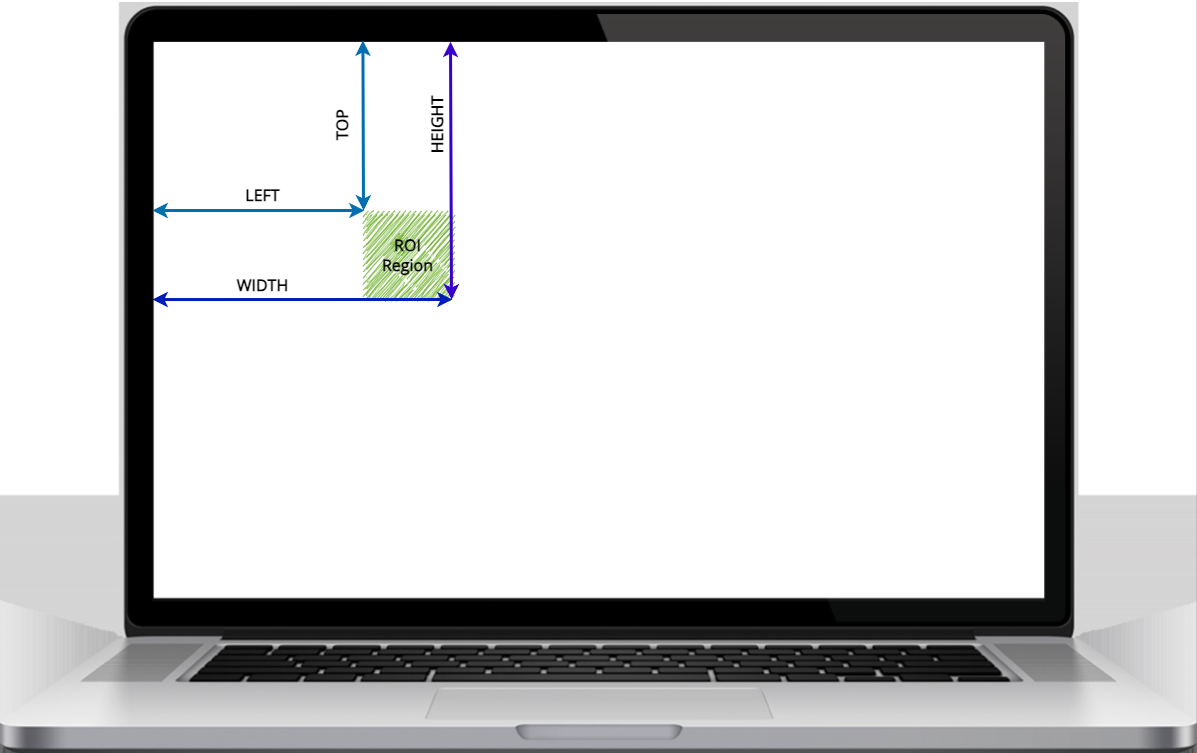
ScreenGear API takes left, top, width, height coordinates of the bounding box of capture screen area(ROI), similar to PIL.ImageGrab.grab, defined below:
left: the x-coordinate of the upper-left corner of the region
top: the y-coordinate of the upper-left corner of the region
width: the width of the complete region from left to the bottom-right corner of the region.
height: the height of the complete region from top to the bottom-right corner of the region.
# import required librariesfromvidgear.gearsimportScreenGearimportcv2# define dimensions of screen w.r.t to given monitor to be capturedoptions={"top":40,"left":0,"width":100,"height":100}# open video stream with defined parametersstream=ScreenGear(logging=True,**options).start()# loop overwhileTrue:# read frames from streamframe=stream.read()# check for frame if NonetypeifframeisNone:break# {do something with the frame here}# Show output windowcv2.imshow("Output Frame",frame)# check for 'q' key if pressedkey=cv2.waitKey(1)&0xFFifkey==ord("q"):break# close output windowcv2.destroyAllWindows()# safely close video streamstream.stop()
With dxcam library backend, you can also assign which GPU devices ids to use along with monitor device ids as tuple (monitor_idx, gpu_idx), as follows:
# import required librariesfromvidgear.gearsimportScreenGearimportcv2# open video stream with defined parameters with monitor at index `1` selectedstream=ScreenGear(monitor=1,logging=True).start()# loop overwhileTrue:# read frames from streamframe=stream.read()# check for frame if NonetypeifframeisNone:break# {do something with the frame here}# Show output windowcv2.imshow("Output Frame",frame)# check for 'q' key if pressedkey=cv2.waitKey(1)&0xFFifkey==ord("q"):break# close output windowcv2.destroyAllWindows()# safely close video streamstream.stop()
With mss library backend, You can also assign monitor value to -1 to fetch frames from all connected multiple monitor screens with mss backend.
With mss library backend, API will output BGRA colorspace frames instead of default BGR.
# import required librariesfromvidgear.gearsimportScreenGearimportcv2# open video stream with defined parameters with monitor at index `1` selectedstream=ScreenGear(monitor=1,logging=True).start()# loop overwhileTrue:# read frames from streamframe=stream.read()# check for frame if NonetypeifframeisNone:break# {do something with the frame here}# Show output windowcv2.imshow("Output Frame",frame)# check for 'q' key if pressedkey=cv2.waitKey(1)&0xFFifkey==ord("q"):break# close output windowcv2.destroyAllWindows()# safely close video streamstream.stop()
With ScreenGear API, you can select from many different backends that generates best performance as well as the most compatible with our machine by employing its backend parameter that supports many different backends:
Remember to install backend library and all of its dependencies you're planning to use with ScreenGear API. More information on all these backends (except dxcam) can be found here ➶
Backend defaults to dxcam library on Windows (if installed), and pyscreenshot otherwise.
Any value on monitor parameter will disable the backend parameter. You cannot use them simultaneously.
# import required librariesfromvidgear.gearsimportScreenGearimportcv2# open video stream with defined parameters and `mss` backend # for extracting frames.stream=ScreenGear(backend="mss",logging=True).start()# loop overwhileTrue:# read frames from streamframe=stream.read()# check for frame if NonetypeifframeisNone:break# {do something with the frame here}# Show output windowcv2.imshow("Output Frame",frame)# check for 'q' key if pressedkey=cv2.waitKey(1)&0xFFifkey==ord("q"):break# close output windowcv2.destroyAllWindows()# safely close video streamstream.stop()
Using ScreenGear with Direct Colorspace Manipulation
ScreenGear API also supports Direct Colorspace Manipulation, which is ideal for changing source colorspace on the run.
A more detailed information on colorspace manipulation can be found here ➶
In following example code, we will start with HSV as source colorspace, and then we will switch to GRAY colorspace when W key is pressed, and then LAB colorspace when E key is pressed, finally default colorspace (i.e. BGR) when S key is pressed. Also, quit when Q key is pressed:
Any incorrect or None-type value, will immediately revert the colorspace to default i.e. BGR.
# import required librariesfromvidgear.gearsimportScreenGearimportcv2# Change colorspace to `HSV`stream=ScreenGear(colorspace="COLOR_BGR2HSV",logging=True).start()# loop overwhileTrue:# read HSV framesframe=stream.read()# check for frame if NonetypeifframeisNone:break# {do something with the HSV frame here}# Show output windowcv2.imshow("Output Frame",frame)# check for key if pressedkey=cv2.waitKey(1)&0xFF# check if 'w' key is pressedifkey==ord("w"):# directly change colorspace at any instantstream.color_space=cv2.COLOR_BGR2GRAY# Now colorspace is GRAY# check for 'e' key is pressedifkey==ord("e"):stream.color_space=cv2.COLOR_BGR2LAB# Now colorspace is CieLAB# check for 's' key is pressedifkey==ord("s"):stream.color_space=None# Now colorspace is default(ie BGR)# check for 'q' key is pressedifkey==ord("q"):break# close output windowcv2.destroyAllWindows()# safely close video streamstream.stop()
# import required librariesfromvidgear.gearsimportScreenGearfromvidgear.gearsimportWriteGearimportcv2# define dimensions of screen w.r.t to given monitor to be capturedoptions={"top":40,"left":0,"width":100,"height":100}# define suitable (Codec,CRF,preset) FFmpeg parameters for writeroutput_params={"-vcodec":"libx264","-crf":0,"-preset":"fast"}# open video stream with defined parametersstream=ScreenGear(monitor=1,logging=True,**options).start()# Define writer with defined parameters and suitable output filename for e.g. `Output.mp4`writer=WriteGear(output="Output.mp4",logging=True,**output_params)# loop overwhileTrue:# read frames from streamframe=stream.read()# check for frame if NonetypeifframeisNone:break# {do something with the frame here}# lets convert frame to gray for this examplegray=cv2.cvtColor(frame,cv2.COLOR_BGR2GRAY)# write gray frame to writerwriter.write(gray)# Show output windowcv2.imshow("Output Gray Frame",gray)# check for 'q' key if pressedkey=cv2.waitKey(1)&0xFFifkey==ord("q"):break# close output windowcv2.destroyAllWindows()# safely close video streamstream.stop()# safely close writerwriter.close()