SSH Tunneling Mode for NetGear API⚓

NetGear's Bidirectional Mode
Overview⚓
New in v0.2.2
This document was added in v0.2.2.
SSH Tunneling Mode allows you to connect NetGear client and server via secure SSH connection over the untrusted network and access its intranet services across firewalls. This mode works with pyzmq's zmq.ssh module for tunneling ZeroMQ connections over ssh.
This mode implements SSH Remote Port Forwarding which enables accessing Host(client) machine outside the network by exposing port to the public Internet. Thereby, once you have established the tunnel, connections to local machine will actually be connections to remote machine as seen from the server.
Beware ☠️
Cybercriminals or malware could exploit SSH tunnels to hide their unauthorized communications, or to exfiltrate stolen data from the network. More information can be found here ➶
All patterns are valid for this mode and it can be easily activated in NetGear API at server end through ssh_tunnel_mode string attribute of its options dictionary parameter during initialization.
Important
- SSH tunneling mode can only be enabled on Server-end to establish remote SSH connection with Client.
- SSH tunneling mode requires Client's SSH Port(default
22) to be TCP Port Forwarded by its Router, which allows Server machine to connect to it remotely. - SSH tunneling mode is NOT compatible with Multi-Servers and Multi-Clients Exclusive Modes yet.
Useful Tips
- It is advise to use
pattern=2to overcome random disconnection due to delays in network. - SSH tunneling Mode is fully supports Bidirectional Mode, Secure Mode and JPEG-Frame Compression.
- It is advised to enable logging (
logging = True) on the first run, to easily identify any runtime errors.
Prerequisites⚓
SSH Tunnel Mode requires pexpect or paramiko as an additional dependency which is not part of standard VidGear package. It can be easily installed via pypi as follows:
Exclusive Attributes⚓
All these attributes will work on Server end only whereas Client end will simply discard them.
For implementing SSH Tunneling Mode, NetGear API currently provide following exclusive attribute for its options dictionary parameter:
-
ssh_tunnel_mode(string) : This attribute activates SSH Tunneling Mode and assigns the"<ssh-username>@<client-public-ip-address>:<tcp-forwarded-port>"SSH URL for tunneling at Server end. Its usage is as follows:On Server end, NetGear automatically validates if the
portis open at specified Client's Public IP Address or not, and if it fails (i.e. port is closed), NetGear will throwAssertionError!The default port value in SSH URL is
22, meaning Server assumes TCP Port22is forwarded on Client's end by default.But, you can also define your own custom TCP forwarded port instead:
Here we're defining our own TCP Port
8080, meaning Server assumes TCP Port8080is forwarded on Client's end. -
ssh_tunnel_pwd(string): This attribute sets the password required to authorize Host(client) for SSH Connection at Server end. This password grant access and controls SSH user can access what. It can be used as follows: -
ssh_tunnel_keyfile(string): This attribute sets path to Host key that provide another way to authenticate Host(client) for SSH Connection at Server end. Its purpose is to prevent man-in-the-middle attacks. It allows device authentication keys to be rotated and managed conveniently and every connection to be secured. It can be used as follows:You can use Ssh-keygen tool for creating new authentication key pairs for SSH Tunneling.
Usage Example⚓
Assumptions for this Example
In this particular example, we assume that:
-
Server:
- Server end is a Raspberry Pi with USB camera connected to it.
- Server is located at remote location and outside the Client's network.
-
Client:
- Client end is a Regular PC/Computer located at
52.155.1.89public IP address for displaying frames received from the remote Server. - Client's SSH Port(default
22) is TCP Port Forwarded by its Router, which allows Server to connect to it remotely. This connection will then be tunneled back to our PC/Computer(Client) and makes TCP connection to it again via port22on localhost(127.0.0.1). - Also, there's a username
testpresent on the PC/Computer(Client) to SSH login with passwordpas$wd.
- Client end is a Regular PC/Computer located at
-
Setup Diagram:
Assumed setup can be visualized throw diagram as follows:
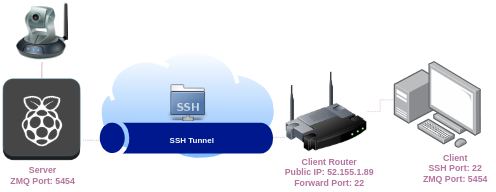
Setup Diagram
Client's End⚓
Open a terminal on Client System (A Regular PC where you want to display the input frames received from the Server) and execute the following python code:
Requirements for Client's End
To ensure a successful Remote NetGear Connection with Server:
-
Install OpenSSH Server: (Tested)
-
Make sure to note down the Client's public IP address required by Server end.
-
Make sure that Client's SSH Port(default
22) is TCP Port Forwarded by its Router to expose it to the public Internet. Also, this forwarded TCP port value is needed at Server end.
Finding Public IP Address
Only IPv4 IP-addresses are supported
Enabling Dynamic DNS
SSH tunneling requires public IP address to able to access host on public Internet. Thereby, if it's troublesome to remember Public IP address or your IP address change constantly, then you can use dynamic DNS services like https://www.noip.com/
- A Public IP address is a globally routable IP address that is assigned to a network device, allowing it direct access to the Internet. They are assigned to the device by its ISP, and each device has a unique public IP address.
- Determining the public IP address involves contacting a remote server over the HTTP/HTTPS or DNS protocol and obtaining the IP address from the remote server response.
- On Desktop machines, the easiest way to find out your public IP address is to google "what is my IP" in your browser:

How to TCP Port Forward in your Router
For more information on Forwarding Port in Popular Home Routers. See this document ➶
Secsh channel X open FAILED: open failed: Administratively prohibited
Error: This error means that installed OpenSSH is preventing connections to forwarded ports from outside your Client Machine.
Solution: You need to change GatewayPorts no option to GatewayPorts yes in the OpenSSH server configuration file sshd_config to allows anyone to connect to the forwarded ports on Client Machine.
You can terminate client anytime by pressing Ctrl+C on your keyboard!
# import required libraries
from vidgear.gears import NetGear
import cv2

# Define NetGear Client at given IP address and define parameters
client = NetGear(
    address="127.0.0.1", # don't change this
    port="5454",
    pattern=2,
    receive_mode=True,
    logging=True,
)

# loop over
while True:

    # receive frames from network
    frame = client.recv()

    # check for received frame if Nonetype
    if frame is None:
        break

    # {do something with the frame here}

    # Show output window
    cv2.imshow("Output Frame", frame)

    # check for 'q' key if pressed
    key = cv2.waitKey(1) & 0xFF
    if key == ord("q"):
        break

# close output window
cv2.destroyAllWindows()

# safely close client
client.close()
Server's End⚓
Now, Open the terminal on Remote Server System (A Raspberry Pi with a webcam connected to it at index 0), and execute the following python code:
Make sure to replace the Client's Public IP Address and Forwarded TCP port(default is 22) in SSH URL with yours in the following example.
On Server end, NetGear automatically validates if the port is open at specified Client's Public IP Address or not, and if it fails (i.e. port is closed), NetGear will throw AssertionError!
You can terminate stream on both side anytime by pressing Ctrl+C on your keyboard!
# import required libraries
from vidgear.gears import VideoGear
from vidgear.gears import NetGear

# activate SSH tunneling with SSH URL, and
# [BEWARE!!!] Change SSH URL and SSH password with yours for this example !!!
options = {
    "ssh_tunnel_mode": "test@52.155.1.89", # defaults to port 22
    "ssh_tunnel_pwd": "pas$wd",
}

# Open live video stream on webcam at first index(i.e. 0) device
stream = VideoGear(source=0).start()

# Define NetGear server at given IP address and define parameters
server = NetGear(
    address="127.0.0.1", # don't change this
    port="5454",
    pattern=2,
    logging=True,
    **options
)

# loop over until KeyBoard Interrupted
while True:

    try:
        # read frames from stream
        frame = stream.read()

        # check for frame if Nonetype
        if frame is None:
            break

        # {do something with the frame here}

        # send frame to server
        server.send(frame)

    except KeyboardInterrupt:
        break

# safely close video stream
stream.stop()

# safely close server
server.close()