FFGear API Advanced Usage
This page covers FFGear's advanced configurations powered by the full FFdecoder feature-sets.
Check out all FFdecoder API's advanced recipes here ➶ to better understand these advanced usage examples.
FFGear requires the deffcode library
FFGear API MUST have the deffcode library installed, along with a valid FFmpeg executable. Any failure in detection will raise ImportError/RuntimeError immediately.
Install via pip:
For FFmpeg installation, see FFmpeg Installation ➶
Using FFGear with Camera Devices (Custom Demuxer)
Example Assumptions
FFmpeg provides a set of platform-specific demuxers to read multimedia streams from different types of video capture devices/sources. Please note that the following example explicitly assumes:
- You're running a Linux machine with a USB webcam connected at the device node/path
/dev/video0. - You already have the appropriate Linux video drivers and related software installed on your machine.
- Your machine uses FFmpeg binaries built with the
--enable-libv4l2flag to support thevideo4linux2(or simplyv4l2) demuxer. You can list all supported demuxers using the terminal command:
These assumptions MAY/MAY NOT suit your current setup. Kindly use parameters appropriate for your system platform and hardware configuration only.
In this example, we output BGR24 video frames from a USB webcam device connected at /dev/video0 on a Linux machine using the video4linux2 (or simply v4l2) demuxer:
Identifying and Specifying Video Capture Device Name/Path/Index and suitable Demuxer on different OS platforms
Windows OS users can use the dshow (DirectShow) to list video input device which is the preferred option for Windows users. You can refer following steps to identify and specify your input video device's name:
-
Identify Video Devices: You can locate your video device's name (already connected to your system) using
dshowas follows:c:\> ffmpeg.exe -list_devices true -f dshow -i dummy ffmpeg version N-45279-g6b86dd5... --enable-runtime-cpudetect libavutil 51. 74.100 / 51. 74.100 libavcodec 54. 65.100 / 54. 65.100 libavformat 54. 31.100 / 54. 31.100 libavdevice 54. 3.100 / 54. 3.100 libavfilter 3. 19.102 / 3. 19.102 libswscale 2. 1.101 / 2. 1.101 libswresample 0. 16.100 / 0. 16.100 [dshow @ 03ACF580] DirectShow video devices [dshow @ 03ACF580] "Integrated Camera" [dshow @ 03ACF580] "USB2.0 Camera" [dshow @ 03ACF580] DirectShow audio devices [dshow @ 03ACF580] "Microphone (Realtek High Definition Audio)" [dshow @ 03ACF580] "Microphone (USB2.0 Camera)" dummy: Immediate exit requested -
Specify Video Device's name: Then, you can specify and initialize your located Video device's name in FFGear API as follows:
-
[OPTIONAL] Specify Video Device's index along with name: If there are multiple Video devices with similar name, then you can use
-video_device_numberparameter to specify the arbitrary index of the particular device. For instance, to open second video device with name"Camera"you can do as follows:
Linux OS users can use the video4linux2 (or its alias v4l2) to list to all capture video devices such as from an USB webcam. You can refer following steps to identify and specify your capture video device's path:
-
Identify Video Devices: Linux systems tend to automatically create file device node/path when the device (e.g. an USB webcam) is plugged into the system, and has a name of the kind
'/dev/videoN', whereNis a index associated to the device. To get the list of all available file device node/path on your Linux machine, you can use thev4l-ctlcommand.You can use
sudo apt install v4l-utilsAPT command to installv4l-ctltool on Debian-based Linux distros. -
Specify Video Device's path: Then, you can specify and initialize your located Video device's path in FFGear API as follows:
-
[OPTIONAL] Specify Video Device's additional specifications: You can also specify additional specifications (such as pixel format(s), video format(s), framerate, and frame dimensions) supported by your Video Device as follows:
You can use
ffmpeg -f v4l2 -list_formats all -i /dev/video0terminal command to list available specifications.
MacOS users can use the AVFoundation to list input devices and is the currently recommended framework by Apple for streamgrabbing on Mac OSX-10.7 (Lion) and later as well as on iOS. You can refer following steps to identify and specify your capture video device's name or index on MacOS/OSX machines:
QTKit is also available for streamgrabbing on Mac OS X 10.4 (Tiger) and later, but has been marked deprecated since OS X 10.7 (Lion) and may not be available on future releases.
-
Identify Video Devices: Then, You can locate your Video device's name and index using
avfoundationas follows:$ ffmpeg -f avfoundation -list_devices true -i "" ffmpeg version N-45279-g6b86dd5... --enable-runtime-cpudetect libavutil 51. 74.100 / 51. 74.100 libavcodec 54. 65.100 / 54. 65.100 libavformat 54. 31.100 / 54. 31.100 libavdevice 54. 3.100 / 54. 3.100 libavfilter 3. 19.102 / 3. 19.102 libswscale 2. 1.101 / 2. 1.101 libswresample 0. 16.100 / 0. 16.100 [AVFoundation input device @ 0x7f8e2540ef20] AVFoundation video devices: [AVFoundation input device @ 0x7f8e2540ef20] [0] FaceTime HD camera (built-in) [AVFoundation input device @ 0x7f8e2540ef20] [1] Capture screen 0 [AVFoundation input device @ 0x7f8e2540ef20] AVFoundation audio devices: [AVFoundation input device @ 0x7f8e2540ef20] [0] Blackmagic Audio [AVFoundation input device @ 0x7f8e2540ef20] [1] Built-in Microphone -
Specify Video Device's name or index: Then, you can specify and initialize your located Video device in FFGear API using its either the name or the index shown in the device listing:
When specifying device's name, abbreviations using just the beginning of the device name are possible. Thus, to capture from a device named "Integrated iSight-camera" just "Integrated" is sufficient:
-
[OPTIONAL] Specify Default Video device: You can also use the default device which is usually the first device in the listing by using "default" as source:
Using FFGear with Desktop (Screen-Capturing)
Example Assumptions
Similar to webcam capturing, FFmpeg provides a set of platform-specific demuxers for desktop capture (screen recording). Please note that the following example explicitly assumes: - You're running a Linux machine with the libxcb module installed properly. - Your machine uses FFmpeg binaries built with the --enable-libxcb flag to support the x11grab demuxer. You can list all supported demuxers using the terminal command:
FFGear API supports screen capture from your entire desktop as well as specific screen regions. Under the hood, it uses platform-specific FFmpeg demuxers for this purpose.
Specifying suitable Parameter(s) and Demuxer for Capturing your Desktop on different OS platforms
Windows OS users can use the gdigrab to grab video from the Windows screen. You can refer following steps to specify source for capturing different regions of your display:
For Windows OS users dshow is also available for grabbing frames from your desktop. But it is highly unreliable and don't works most of the times.
-
Capturing entire desktop: For capturing all your displays as one big contiguous display, you can specify source, suitable parameters and demuxers in FFGear API as follows:
-
Capturing a region: If you want to limit capturing to a region, and show the area being grabbed, you can specify source and suitable parameters in FFGear API as follows:
x_offsetandy_offsetspecify the offsets of the grabbed area with respect to the top-left border of the desktop screen. They default to0.# define suitable parameters options = { "-framerate": "30", # input framerate "-ffprefixes": [ "-offset_x", "10", "-offset_y", "20", # grab at position 10,20 "-video_size", "640x480", # frame size "-show_region", "1", # show only region ], } # stream with "desktop" source for BGR24 output stream = FFGear(source="desktop", source_demuxer="gdigrab", frame_format="bgr24", logging=True, **options)
Linux OS users can use the x11grab to capture an X11 display. You can refer following steps to specify source for capturing different regions of your display:
For X11 display, the source input has the syntax: "display_number.screen_number[+x_offset,y_offset]".
-
Capturing entire desktop: For capturing all your displays as one big contiguous display, you can specify source, suitable parameters and demuxers in FFGear API as follows:
-
Capturing a region: If you want to limit capturing to a region, and show the area being grabbed, you can specify source and suitable parameters in FFGear API as follows:
x_offsetandy_offsetspecify the offsets of the grabbed area with respect to the top-left border of the X11 screen. They default to0.# define suitable parameters options = { "-framerate": "30", # input framerate "-ffprefixes": [ "-video_size", "1024x768", # frame size ], } # stream with ":0.0" desktop source(starting with the upper-left corner at x=10, y=20) # for BGR24 output stream = FFGear(source=":0.0+10,20", source_demuxer="x11grab", frame_format="bgr24", logging=True, **options)
MacOS users can use the AVFoundation to list input devices and is the currently recommended framework by Apple for stream grabbing on Mac OSX-10.7 (Lion) and later as well as on iOS. You can refer following steps to identify and specify your capture video device's name or index on MacOS/OSX machines:
QTKit is also available for stream grabbing on Mac OS X 10.4 (Tiger) and later, but has been marked deprecated since OS X 10.7 (Lion) and may not be available on future releases.
-
Identify Video Devices: You can enumerate all the available input devices including screens ready to be captured using
avfoundationas follows:$ ffmpeg -f avfoundation -list_devices true -i "" ffmpeg version N-45279-g6b86dd5... --enable-runtime-cpudetect libavutil 51. 74.100 / 51. 74.100 libavcodec 54. 65.100 / 54. 65.100 libavformat 54. 31.100 / 54. 31.100 libavdevice 54. 3.100 / 54. 3.100 libavfilter 3. 19.102 / 3. 19.102 libswscale 2. 1.101 / 2. 1.101 libswresample 0. 16.100 / 0. 16.100 [AVFoundation input device @ 0x7f8e2540ef20] AVFoundation video devices: [AVFoundation input device @ 0x7f8e2540ef20] [0] FaceTime HD camera (built-in) [AVFoundation input device @ 0x7f8e2540ef20] [1] Capture screen 0 [AVFoundation input device @ 0x7f8e2540ef20] AVFoundation audio devices: [AVFoundation input device @ 0x7f8e2540ef20] [0] Blackmagic Audio [AVFoundation input device @ 0x7f8e2540ef20] [1] Built-in Microphone -
Capturing entire desktop: Then, you can specify and initialize your located screens in FFGear API using its index shown:
-
[OPTIONAL] Capturing mouse: You can also specify additional specifications to capture the mouse pointer and screen mouse clicks as follows:
For capturing all your displays as one big contiguous display in FFGear API:
For limit capturing to a region, and show the area being grabbed:
x_offset and y_offset specify the offsets of the grabbed area with respect to the top-left border of the X11 screen. They default to 0.
Hardware-Accelerated Decoding
FFGear exposes FFdecoder's full hardware acceleration support via the options dictionary. You can use NVIDIA CUVID, CUDA, VAAPI, or any other -hwaccel backend supported by your FFmpeg build.
NVIDIA CUVID Decoding
Example Assumptions
Please note that following example explicitly assumes:
- You're running Linux operating system with a supported NVIDIA GPU.
-
You're using FFmpeg 4.4 or newer, configured with at least
--enable-nonfree --enable-cuda-nvcc --enable-libnpp --enable-cuvid --enable-nvencconfiguration flags during compilation. For compilation follow these instructions ➶ -
Using
h264_cuviddecoder: Remember to check if your FFmpeg compiled with H.264 CUVID decoder support by executing following one-liner command in your terminal, and observing if output contains something similar as follows:Verifying H.264 CUVID decoder support in FFmpeg
$ ffmpeg  -hide_banner -decoders | grep cuvid

V..... av1_cuvid            Nvidia CUVID AV1 decoder (codec av1)
V..... h264_cuvid           Nvidia CUVID H264 decoder (codec h264)
V..... hevc_cuvid           Nvidia CUVID HEVC decoder (codec hevc)
V..... mjpeg_cuvid          Nvidia CUVID MJPEG decoder (codec mjpeg)
V..... mpeg1_cuvid          Nvidia CUVID MPEG1VIDEO decoder (codec mpeg1video)
V..... mpeg2_cuvid          Nvidia CUVID MPEG2VIDEO decoder (codec mpeg2video)
V..... mpeg4_cuvid          Nvidia CUVID MPEG4 decoder (codec mpeg4)
V..... vc1_cuvid            Nvidia CUVID VC1 decoder (codec vc1)
V..... vp8_cuvid            Nvidia CUVID VP8 decoder (codec vp8)
V..... vp9_cuvid            Nvidia CUVID VP9 decoder (codec vp9)
You can also use any of above decoder in the similar way, if supported.
Use
ffmpeg -decodersterminal command to lists all FFmpeg supported decoders. -
You already have appropriate Nvidia video drivers and related softwares installed on your machine.
- If the stream is not decodable in hardware (for example, it is an unsupported codec or profile) then it will still be decoded in software automatically, but hardware filters won't be applicable.
These assumptions MAY/MAY NOT suit your current setup. Kindly use suitable parameters based your system platform and hardware settings only.
In this example, we use Nvidia's H.264 CUVID Video decoder(h264_cuvid) in FFGear API to achieve GPU-accelerated hardware video decoding of YUV420p(yuv420p) frames from a given Video file (say foo.mp4), and the -enforce_cv_patch flag for OpenCV compatibility:
More information on Nvidia's CUVID can be found here ➶
More information on Nvidia's CUVID can be found here ➶
NVIDIA CUDA Decoding
Example Assumptions
The following example explicitly assumes: - You're running Linux operating system with a supported NVIDIA GPU. - You're using FFmpeg 4.4 or newer, configured with at least --enable-nonfree --enable-cuda-nvcc --enable-libnpp --enable-cuvid --enable-nvenc configuration flags during compilation. For compilation follow these instructions ➶
??? danger "Verifying NVDEC/CUDA support in FFmpeg"

    To use CUDA Video-decoder(`cuda`), remember to check if your FFmpeg compiled with it by executing following commands in your terminal, and observing if output contains something similar as follows:

    ```sh
    $ ffmpeg  -hide_banner -pix_fmts | grep cuda
    ..H.. cuda                   0              0      0

    $ ffmpeg  -hide_banner -filters | egrep "cuda|npp"
    ... bilateral_cuda    V->V       GPU accelerated bilateral filter
    ... chromakey_cuda    V->V       GPU accelerated chromakey filter
    ... colorspace_cuda   V->V       CUDA accelerated video color converter
    ... hwupload_cuda     V->V       Upload a system memory frame to a CUDA device.
    ... overlay_cuda      VV->V      Overlay one video on top of another using CUDA
    ... scale_cuda        V->V       GPU accelerated video resizer
    ... scale_npp         V->V       NVIDIA Performance Primitives video scaling and format conversion
    ... scale2ref_npp     VV->VV     NVIDIA Performance Primitives video scaling and format conversion to the given reference.
    ... sharpen_npp       V->V       NVIDIA Performance Primitives video sharpening filter.
    ... thumbnail_cuda    V->V       Select the most representative frame in a given sequence of consecutive frames.
    ... transpose_npp     V->V       NVIDIA Performance Primitives video transpose
    T.. yadif_cuda        V->V       Deinterlace CUDA frames
    ```
- You already have appropriate Nvidia video drivers and related softwares installed on your machine.
- If the stream is not decodable in hardware (for example, it is an unsupported codec or profile) then it will still be decoded in software automatically, but hardware filters won't be applicable.
These assumptions MAY/MAY NOT suit your current setup. Kindly use suitable parameters based your system platform and hardware settings only.
In this example, we use Nvidia's CUDA Internal hwaccel Video decoder(cuda) in FFGear API to automatically detect best NV-accelerated video codec and keeping video frames in GPU memory (for applying hardware filters), applying GPU-side scale and FPS filters before downloading as NV12(nv12) pixel-format frames from a given video file (say foo.mp4), and the -enforce_cv_patch flag for OpenCV compatibility:
NV12(for 4:2:0 input) and NV21(for 4:4:4 input) are the only supported pixel format. You cannot change pixel format to any other since NV-accelerated video codec supports only them.
NV12 is a biplanar format with a full sized Y plane followed by a single chroma plane with weaved U and V values. NV21 is the same but with weaved V and U values. The 12 in NV12 refers to 12 bits per pixel. NV12 has a half width and half height chroma channel, and therefore is a 420 subsampling. NV16 is 16 bits per pixel, with half width and full height. aka 422. NV24 is 24 bits per pixel with full sized chroma channel. aka 444. Most NV12 functions allow the destination Y pointer to be NULL.
More information on Nvidia's GPU Accelerated Decoding can be found here ➶
Hardware-Accelerated Video Transcoding
FFGear, in conjunction with WriteGear, provides direct access to FFmpeg’s powerful transcoding capabilities while still allowing real-time frame processing with immense flexibility. Together, these APIs can leverage GPU-backed hardware-accelerated decoding and encoding pipelines, dramatically improving video transcoding performance for real-time multimedia workloads.
Performance Bottleneck in Hardware-Accelerated Video Transcoding with Real-Time Frame Processing
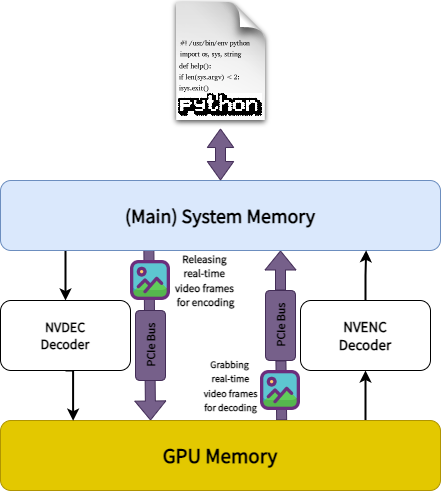
When using FFmpeg with -hwaccel cuda -hwaccel_output_format cuda, decoded frames remain in GPU memory. This avoids expensive GPU ↔ CPU memory transfers and enables near-optimal transcoding performance on supported hardware.
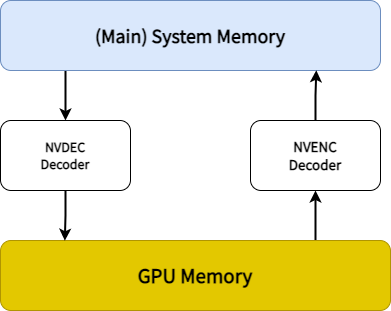
However, when performing real-time frame processing in Python with FFGear and WriteGear, decoded frames must be transferred from GPU memory back to system memory so Python can access and process them.
This introduces several performance bottlenecks:
- Explicit GPU ↔ CPU memory transfers over the PCIe bus
- Increased latency from continuous frame movement
- Higher PCIe bandwidth utilization, especially with uncompressed frames
- Potential PCIe bus saturation, limiting overall throughput
As a result, real-time processing pipelines incur additional overhead that can impact performance.
Even with these limitations, hardware acceleration still provides major advantages over software-only transcoding:
- Lower CPU utilization, since most processing stays on the GPU
- Faster execution compared to CPU-based pipelines
- Accelerated video operations, including scaling, filtering, and deinterlacing
- Better overall system resource utilization, freeing CPU resources for parallel workloads
In contrast, software transcoding is entirely CPU-bound and generally less efficient for high-throughput or real-time workloads.
Although GPU ↔ CPU memory transfers introduce unavoidable overhead in real-time processing pipelines, hardware acceleration still delivers substantial performance and efficiency gains—making it the preferred choice for most modern video workflows.
CUDA-accelerated Transcoding with OpenCV's VideoWriter API
Example Assumptions
The following example explicitly assumes:
- You're running Linux operating system with a supported NVIDIA GPU.
-
You're using FFmpeg 4.4 or newer, configured with at least
--enable-nonfree --enable-cuda-nvcc --enable-libnpp --enable-cuvid --enable-nvencconfiguration flags during compilation. For compilation follow these instructions ➶Verifying NVDEC/CUDA support in FFmpeg
To use CUDA Video-decoder(
cuda), remember to check if your FFmpeg compiled with it by executing following commands in your terminal, and observing if output contains something similar as follows:$ ffmpeg -hide_banner -pix_fmts | grep cuda ..H.. cuda 0 0 0 $ ffmpeg -hide_banner -filters | egrep "cuda|npp" ... bilateral_cuda V->V GPU accelerated bilateral filter ... chromakey_cuda V->V GPU accelerated chromakey filter ... colorspace_cuda V->V CUDA accelerated video color converter ... hwupload_cuda V->V Upload a system memory frame to a CUDA device. ... overlay_cuda VV->V Overlay one video on top of another using CUDA ... scale_cuda V->V GPU accelerated video resizer ... scale_npp V->V NVIDIA Performance Primitives video scaling and format conversion ... scale2ref_npp VV->VV NVIDIA Performance Primitives video scaling and format conversion to the given reference. ... sharpen_npp V->V NVIDIA Performance Primitives video sharpening filter. ... thumbnail_cuda V->V Select the most representative frame in a given sequence of consecutive frames. ... transpose_npp V->V NVIDIA Performance Primitives video transpose T.. yadif_cuda V->V Deinterlace CUDA framesVerifying H.264 NVENC encoder support in FFmpeg
To use NVENC Video-encoder(
cuda), remember to check if your FFmpeg compiled with H.264 NVENC encoder support. You can easily do this by executing following one-liner command in your terminal, and observing if output contains something similar as follows:$ ffmpeg -hide_banner -encoders | grep nvenc V....D av1_nvenc NVIDIA NVENC av1 encoder (codec av1) V....D h264_nvenc NVIDIA NVENC H.264 encoder (codec h264) V....D hevc_nvenc NVIDIA NVENC hevc encoder (codec hevc)You can also use other NVENC encoder in the similar way, if supported.
-
You already have appropriate Nvidia video drivers and related softwares installed on your machine.
- If the stream is not decodable in hardware (for example, it is an unsupported codec or profile) then it will still be decoded in software automatically, but hardware filters won't be applicable.
These assumptions MAY/MAY NOT suit your current setup. Kindly use suitable parameters based your system platform and hardware settings only.
In this example, we will:
- Use NVIDIA’s CUDA internal hardware-accelerated decoder (
cuda) with the FFGear API to automatically select the best NV-accelerated video codec while keeping decoded frames in GPU memory for hardware-accelerated filtering. - Apply GPU-accelerated scaling and cropping directly in GPU memory.
- Download processed frames into system memory as patched NV12 frames.
- Convert NV12 frames into the BGR24 pixel format using the
-enforce_cv_patchflag together with OpenCV’scvtColor()method for OpenCV compatibility. - Encode the resulting BGR24 frames using OpenCV’s
VideoWriterAPI.
You can use FFGear's stream.stream.metadata property object that dumps source Video's metadata information (as JSON string) to retrieve source framerate.
More information on Nvidia's NVENC Encoder can be found here ➶
CUDA-NVENC-accelerated Transcoding with WriteGear API (Compression Mode)
FFGear API in conjunction with WriteGear API (Compression Mode) creates a high-level High-performance Lossless FFmpeg Transcoding (Decoding + Encoding) Pipeline
that is able to exploit almost any FFmpeg parameter for achieving anything imaginable with multimedia video data all while allow us to manipulate the real-time video frames with immense flexibility.
Example Assumptions
The following example explicitly assumes:
- You're running Linux operating system with a supported NVIDIA GPU.
-
You're using FFmpeg 4.4 or newer, configured with at least
--enable-nonfree --enable-cuda-nvcc --enable-libnpp --enable-cuvid --enable-nvencconfiguration flags during compilation. For compilation follow these instructions ➶Verifying NVDEC/CUDA support in FFmpeg
To use CUDA Video-decoder(
cuda), remember to check if your FFmpeg compiled with it by executing following commands in your terminal, and observing if output contains something similar as follows:$ ffmpeg -hide_banner -pix_fmts | grep cuda ..H.. cuda 0 0 0 $ ffmpeg -hide_banner -filters | egrep "cuda|npp" ... bilateral_cuda V->V GPU accelerated bilateral filter ... chromakey_cuda V->V GPU accelerated chromakey filter ... colorspace_cuda V->V CUDA accelerated video color converter ... hwupload_cuda V->V Upload a system memory frame to a CUDA device. ... overlay_cuda VV->V Overlay one video on top of another using CUDA ... scale_cuda V->V GPU accelerated video resizer ... scale_npp V->V NVIDIA Performance Primitives video scaling and format conversion ... scale2ref_npp VV->VV NVIDIA Performance Primitives video scaling and format conversion to the given reference. ... sharpen_npp V->V NVIDIA Performance Primitives video sharpening filter. ... thumbnail_cuda V->V Select the most representative frame in a given sequence of consecutive frames. ... transpose_npp V->V NVIDIA Performance Primitives video transpose T.. yadif_cuda V->V Deinterlace CUDA framesVerifying H.264 NVENC encoder support in FFmpeg
To use NVENC Video-encoder(
cuda), remember to check if your FFmpeg compiled with H.264 NVENC encoder support. You can easily do this by executing following one-liner command in your terminal, and observing if output contains something similar as follows:$ ffmpeg -hide_banner -encoders | grep nvenc V....D av1_nvenc NVIDIA NVENC av1 encoder (codec av1) V....D h264_nvenc NVIDIA NVENC H.264 encoder (codec h264) V....D hevc_nvenc NVIDIA NVENC hevc encoder (codec hevc)You can also use other NVENC encoder in the similar way, if supported.
-
You already have appropriate Nvidia video drivers and related softwares installed on your machine.
- If the stream is not decodable in hardware (for example, it is an unsupported codec or profile) then it will still be decoded in software automatically, but hardware filters won't be applicable.
These assumptions MAY/MAY NOT suit your current setup. Kindly use suitable parameters based your system platform and hardware settings only.
Additional Parameters in WriteGear API
WriteGear API only requires a valid Output filename (e.g. output_foo.mp4) as input, but you can easily control any output specifications (such as bitrate, codec, framerate, resolution, subtitles, etc.) supported by FFmpeg (in use).
You can use FFGear's stream.stream.metadata property object that dumps source Video's metadata information (as JSON string) to retrieve source framerate.
In this example, we will:
- Use NVIDIA’s CUDA internal hardware-accelerated decoder (
cuda) with the FFGear API to automatically select the best NV-accelerated video codec while keeping decoded frames in GPU memory for hardware-accelerated filtering. - Apply GPU-accelerated scaling and cropping directly in GPU memory.
- Download processed frames into system memory as patched NV12 frames.
- Convert NV12 frames into the BGR24 pixel format using the
-enforce_cv_patchflag together with OpenCV’scvtColor()method for OpenCV compatibility. - Encode the resulting BGR24 frames with the WriteGear API using NVIDIA’s hardware-accelerated H.264 NVENC video encoder (
h264_nvenc) to generate a lossless output video.
In this example, we will:
- Use NVIDIA’s CUDA internal hardware-accelerated decoder (
cuda) with the FFGear API to automatically select the best NV-accelerated video codec while keeping decoded frames in GPU memory for hardware-accelerated filtering. - Apply GPU-accelerated scaling and cropping directly in GPU memory.
- Download processed frames into system memory as patched NV12 frames.
- Encode the resulting NV12 frames directly with the WriteGear API using NVIDIA’s hardware-accelerated H.264 NVENC video encoder (
h264_nvenc) to generate a lossless output video.
Per-Frame Metadata Extraction
The
-extract_metadataoption enables FFGear to yield(frame, metadata)tuples fromread(), wheremetadatais parsed from FFmpeg'sshowinfofilter via an asynchronous background daemon — leaving the main frame pipe fully unthrottled.
The metadata dict contains the following keys:
| Key | Type | Description |
|---|---|---|
frame_num | int | Monotonic frame index as emitted by FFmpeg. |
pts_time | float | Presentation timestamp in seconds. |
is_keyframe | bool | True if the frame is a keyframe (I-frame). |
frame_type | str | One of "I" (keyframe), "P" (predictive), "B" (bi-predictive), "?" (unknown). |
Incompatible with -filter_complex
The -extract_metadata cannot be combined with the -filter_complex attribute. If both are supplied, a warning is logged and metadata extraction is silently disabled. A pre-existing -vf is fine — showinfo is automatically appended onto it.
Keyframe-Only Decoding for AI Inference
Many Computer Vision workflows — perceptual hashing, scene-change detection, and AI model inference (YOLO, ResNet, etc.) — only need to process Keyframes (I-frames). Running inference on every P/B frame wastes compute, since most frames contain only small incremental changes. With the
-extract_metadataoption, you can detect keyframes and run inference only on those frames while skipping all non-keyframes. This can reduce unnecessary decoding and inference workloads by upto 98%, significantly improving pipeline efficiency and lowering compute usage.
In this example we run heavy AI model on keyframes only and skipping all non-keyframes:
Depending on the GOP size (Group of Pictures), the optimization pattern shown above can reduce downstream processing time by 10–50× without missing any scene-boundary information.
Checkout this bonus example ➶ demonstrating FFGear optimizing YOLOv10-Nano model inference by processing only Keyframes (I-frames) while skipping all non-keyframes (P/B-frames).
Variable-Frame-Rate (VFR) Synchronization
Most modern video sources — smartphones, screen recordings, webcams — are Variable-Frame-Rate. Assuming a constant frame rate will drift out of sync very quickly.
In this example we use meta["pts_time"] to get the exact presentation timestamp of every frame and skip frames based on the actual time difference between frames:
The same pts_time stream is what you need to keep processed frames locked to an audio track when re-muxing downstream.
Complex FFmpeg Filtergraphs
For advanced multi-input or multi-output pipelines, FFGear supports -filter_complex via the options dictionary.
Complex filtergraphs (-filter_complex) are incompatible with -extract_metadata. Both cannot be active simultaneously.
Apply custom Watermark Image Overlay Filter

In this example, we apply a watermark image (say watermark.png with transparent background) overlay to the 10 seconds of video file (say foo.mp4) using FFmpeg's overlay filter with some additional filtering:
You can use FFGear API's stream.stream.metadata property object that dumps Source Metadata as JSON to retrieve source framerate and frame-size.
Remember to replace watermark.png watermark image absolute file path with yours before executing this example.
Generate Mandelbrot test pattern with Vectorscope & Waveforms
The
mandelbrotgraph generate a Mandelbrot set fractal, that progressively zoom towards a specific point.
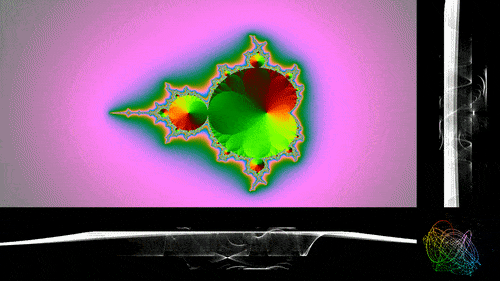
In this example, we generate a 10-second Mandelbrot test pattern (1280x720 resolution at 30 FPS) using the mandelbrot filter source with the lavfi virtual input device. We then stack a vectorscope (visualizes color component relationships) and two waveform monitors (visualize YUV color intensity levels) alongside the video, and save the final output using the WriteGear API:
Bonus Examples
Checkout more advanced FFGear examples with unusual configuration here ➶